The Epson 1400 printer seems to be incredibly similar to the R2400 and R1800 in terms of case and waste ink design with one important difference. Instead of utilising two waste tubes this printer has only one.
This guide provides greater detail on how to get the tube to the outside with minimal modification to the printer case.
Releasing the Case Side
To get to the waste ink tube you need to remove the right side of the case (when looking at printer front).
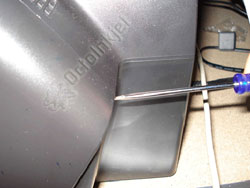
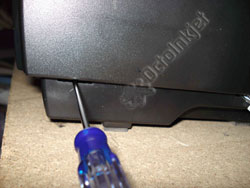
So, you need to undo the screw at the rear and use a flat head screwdriver to lift and gently release the tab locks (as shown below – figures #1 & #2)
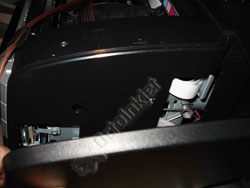
With all the tabs released you should then be able to remove the side panel to reveal the waste ink tubing (fig #3)
Note: If you do break off the internal tabs don’t panic as this won’t affect the printer functionality. Just make sure you remove any broken pieces from the printer internals so they don’t jam anything up
Installing your external kit
Ok, now that you have the side panel off you can see the internals as shown in the image right.
The 1400 (like the R1800/R2400,etc.. printers) has a junction point here which allows you to access the waste tube before it goes down into the pads.
Releasing the Tube
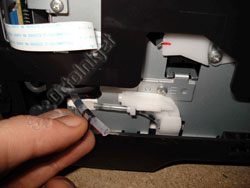
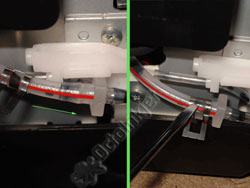
To release the waste tube pinch the metal butterfly clamp and gently slide it towards the front of the printer (as shown) until the clamp is past the tube join.
DO NOT, under any circumstances, try to yank the tube or pull the tubing from the front of the printer. If you do that you’ll potentially break the pump and make fixing your printer a major problem. Patience is a vital part of your toolkit, so take your time!
Next, pull the coloured waste tube gently off the white plastic mount point.
This releases the printers original waste tube and it’s this you’ll be extending out to your external waste ink tank.
Prepare and Thread Extension Tube
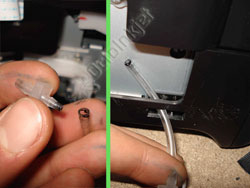
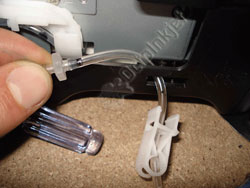
You now want to remove the barbed fitting from your waste ink kit (assuming you’re using one of the OctoInkjet kits) so you can feed the tube through the tab hole (as shown).
Tip: If the fitting doesn’t want to come out, try heating the tube end and fitting with steam from a kettle to make the tubing more flexible and easier to remove the fitting.
Important: Remember steam scalds so remove the tubing from the steam before you try to remove the fitting and be careful!
With the tubing threaded through the hole and into the printer inner area you now re-attach the barbed fitting (hint: the thinner barbed end goes into the extention tube)
Now, push the wide part of the barb fitting into the printers waste tube, being careful not to pull the tubing off the pump!
Then slide the metal butterfly clamp back into place to hold the tube on the barb.
This is probably overkill as the barb should hold everything in place but it keeps things neat and may be necessary if you’re using your own tubing and kit.
This more or less finishes off the actual kit fitting, and now it just remains to replace the side panel.
Putting the Printer Back Together
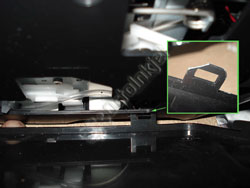
Before you re-attach the side panel you can modify the tab/lock (where the tube has exited the printer) to ensure the tubing isn’t crimped or flattened by it.
This is optional but recommended as any constriction of the tube may cause backflow of waste ink, or stop it exiting the printer altogether.
Once you’re ready, simply fit the panel back into position, check there’s no obstruction of the tube and then screw the panel back into place.
IMPORTANT: Before you leave the printer, it’s essential to check that waste ink flows properly into the tank/bag you’re using. To do this run at least one cleaning routine on your printer and watch for waste flow through the tube. If you don’t see any then there’s an obstruction which you need to resolve before you continue.
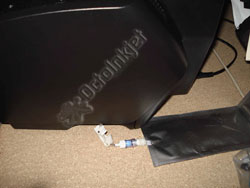
The finished modification.
Note: this image shows the results using a standard WIB solo kit which has a tube length of 15cm.
A longer tube is generally required so make sure you check the tube length is 20cm+ before buying a kit ("Solo Long" is the norm’ for OctoInkjet kits)
QuickFind your model
Current reset, kit and other information for your printer:



I have the Epson 1400 utilizing a CISS system and your waste ink set-up (with the flexible bag).
Do I empty the bag or buy a replacement?
Regards
The kit is designed to be re-usable so you should refer to the instructions provided with the kit on how to “vent” or empty the bag. This requires the spare connector that came with your kit… A PDF copy of the info is also available here if you need it.